The first clue was the socks. They used to glide on the living room floor like a kid’s ice skates, then one morning they just… stopped. The wood looked tired, grey in the high-traffic spots, scuffed where sunlight hit hardest. The kind of dullness that no Instagram filter can hide.
A Saturday cleaning frenzy followed: vinegar mix, a little dish soap, then that old bottle of wax from the back of the cupboard. The result? Sticky patches, streaks that caught the light in all the wrong ways, and a faint smell of salad dressing. The floor looked cleaner, yes. But it didn’t look alive.
That night, scrolling half-distracted through home hacks, one strange little tip kept popping up. A trick so simple it sounded like a joke.
And yet, that’s the one that finally brought the shine back.

Why your hardwood has lost its glow in the first place
If your hardwood floor looks dull no matter how much you scrub, you’re not imagining it. Wood ages in slow motion. Each step grinds a little dust into the finish. Each wet footprint, each dropped crumb, each dragged chair leaves a trace. One day you wake up and the warm honey tone you loved has turned into a flat, blurry brown.

Most of us react the same way: we clean harder. Hotter water, stronger products, old recipes involving vinegar and a heroic amount of elbow grease. Then we stare at the floor, slightly out of breath, and wonder why it still doesn’t shine.
The truth is, the problem isn’t dirt. It’s buildup.
Picture your floor like a pair of glasses. Dust is like fingerprints. Easy to wipe. But over time, you also get layers of old cleaning spray, tiny scratches, and fogginess you don’t notice until you clean the lenses properly. Hardwood is the same.
A lot of popular “miracle” recipes — vinegar, soap-heavy mixtures, too-much wax — leave invisible films on top of the finish. They cling to tiny scratches, attract more dust, and make the wood look cloudy. You mop, it shines for an hour, then dries into a dull, streaky surface again.
One homeowner I spoke to had been using a vinegar-and-water mix for years. When a pro came to deep clean the floor, the difference was so extreme she thought they had refinished it. They hadn’t. They had just removed years of residue.
There’s also the science of wood to consider. Hardwood planks are sealed with a finish — polyurethane, oil, or wax — that protects the fibers. Vinegar is acidic. Used occasionally, diluted, it’s not a disaster. Used all the time, it slowly eats at that protective layer.
Wax creates another issue. Layer on layer, especially over modern polyurethane finishes, turns into a sticky, uneven film that grabs every speck of dust. The shine you thought you were adding actually blocks light from bouncing cleanly off the floor.
So before we talk about shine, we need to shift the goal. Not scrubbing harder. Not adding more stuff on top.
Clearing the stage so the original finish can do its job again.
The simple pantry trick that makes wood look new again
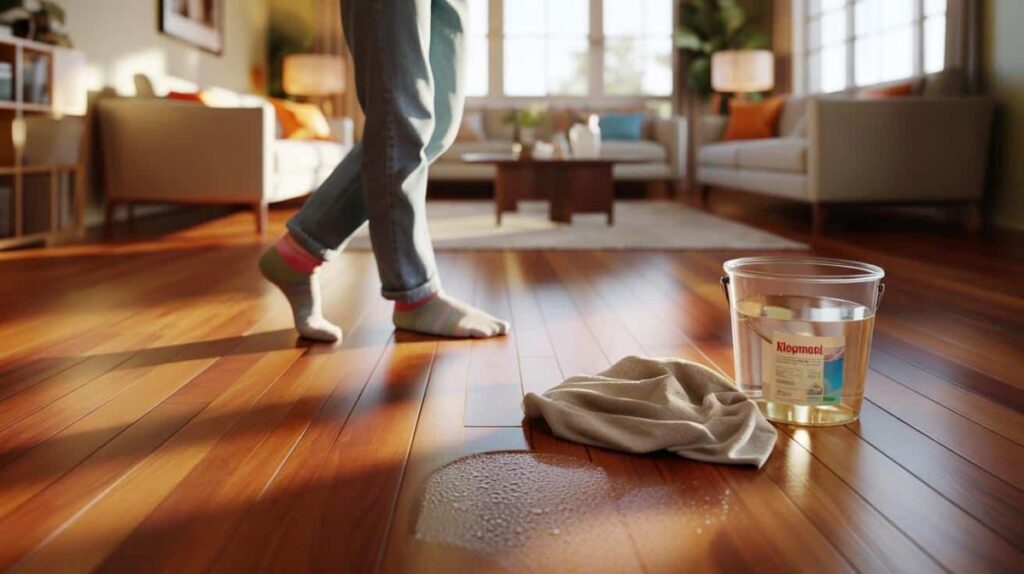
Ready for the “this can’t be it” trick? Here it is: a barely damp microfiber mop and a tiny splash of neutral dish soap, followed by a buff with a clean, dry cloth or towel. No vinegar. No wax. No glossy potions promising miracles in one coat.
Fill a bucket with warm (not hot) water. Add just a couple of drops of mild, clear dish soap — the kind you’d trust on your hands. Dip your microfiber mop, wring it so hard it feels almost dry, and work in small sections. Then, while that area is still faintly damp, buff it gently with a dry microfiber cloth or an old cotton towel.
That last step is the secret. The buffing removes excess moisture and residue, and it’s that light friction that wakes up the existing finish and brings back a natural, soft shine.
Most people skip the buffing step because it sounds fussy. Let’s be honest: nobody really does this every single day. But once or twice a month in the living room or hallway can transform the way your floor looks.
A reader from Boston told me she tried this “soap and buff” method after years of chasing the perfect product. She did one half of her open-plan space on a Sunday. When the sun moved across the room in the afternoon, she could literally see a line where the floor went from cloudy to crisp. Her kids noticed first, slipping across the newly-smooth side in their socks, laughing because it felt “like grandma’s house.”

*That’s when you know a floor is really clean — when it feels different underfoot before you even look down.*
There are a few common traps to avoid with this trick, and they’re all very human. We think more soap equals more clean. We rush and leave the mop wetter than we should. We layer different products on top of each other, hoping one of them will be “the one.”
The plain truth: your floor needs less, not more. A tiny bit of neutral soap is enough to cut grease from bare feet and cooking fumes. Too much turns into streaks once it dries. So does using hot water, which can soften some finishes and encourage wood to swell.
As one flooring specialist put it:
“People blame the wood, but most of the time I’m not removing scratches. I’m just stripping off years of bad cleaner choices. Underneath, the floor is still beautiful.”
Now, think of your routine in three simple boxes:
- Dry care: daily or weekly dusting with a soft broom or vacuum on “hard floor” mode.
- Gentle wash: that light, soapy, almost-dry mop, followed by a quick buff.
- Occasional reset: every few months, skip all products for one clean with just water and a buff, to clear residue.
That’s it. No potions, no complicated schedules, no chemistry experiments in your bucket.
Living with floors that finally shine again
Once you see your floor come back to life with such a simple habit, it changes the way you look at the whole room. Colors seem warmer. Furniture looks less tired. Even that “we really need new floors” conversation goes quiet for a while.
You also start moving differently. You hear the creaks again, notice the tiny knots in the planks, run your toes along the grain when you’re on the sofa. The floor stops being a problem to solve and becomes part of the story of the house.
Friends might ask what product you used, expecting the name of a new spray or an expensive oil. There’s a quiet satisfaction in saying: almost nothing. Just gentle cleaning, a bit of patience, and a towel.
We’ve all been there, that moment when you look at your home and feel like everything is worn out at once. Sometimes it’s not a renovation you’re craving. It’s the feeling that what you already have is being cared for properly. Floors are like that. They respond to small, consistent kindness.
And those few extra minutes with a dry cloth, buffing as the light hits the boards, can become oddly calming.
You might end up sharing this trick with a neighbor, or your parents when they complain their parquet is “ruined.” You might save yourself years of over-cleaning and under-enjoying. Not every hack you see online deserves a place in your home. This one does because it doesn’t fight the wood.
It respects what’s already there. Lets the finish breathe. Gives the light a clean surface to dance on again.
 Goodbye kitchen cabinets: the cheaper new trend that won’t warp, swell, or go mouldy over time
The next time your socks suddenly start sliding a little farther across the room, you’ll know.
The shine didn’t come from a bottle. It came from learning to do just enough — and no more.

| Key point | Detail | Value for the reader |
|---|---|---|
| Skip vinegar and heavy wax | They can damage finishes and create cloudy buildup over time | Protects your floors from long-term dullness and costly refinishing |
| Use a barely damp microfiber mop + tiny dish soap | Warm water with a few drops of neutral soap, followed by drying the surface | Restores natural shine with products you already own |
| Buff right after mopping | Dry microfiber or cotton towel to lift residue and activate the existing finish | Gives that “like new” glow without extra chemicals or effort |
FAQ:
- Question 1Can I ever use vinegar on my hardwood floors?Occasionally, very diluted vinegar on a well-sealed floor won’t destroy it, but regular use slowly eats at the finish. For long-term care, neutral soap and water are much safer.
- Question 2What kind of dish soap should I choose?Go for a mild, clear or light-colored, fragrance-light soap without degreasers or “antibacterial” additives. Those extras can leave films and streaks.
- Question 3How wet is “barely damp” for the mop?When you wring it, no water should drip. The mop head should feel just moist enough to glide, not leave visible puddles or beads of water on the floor.
- Question 4How often should I buff the floors?For busy areas, once or twice a month is plenty. For bedrooms or low-traffic spaces, every couple of months works. You don’t need to do it every time you clean.
- Question 5Will this trick fix deep scratches or worn patches?No, this method revives shine and removes residue, but it can’t replace missing finish or damaged wood. Deep wear, grey patches, or gouges usually need sanding and refinishing by a professional.