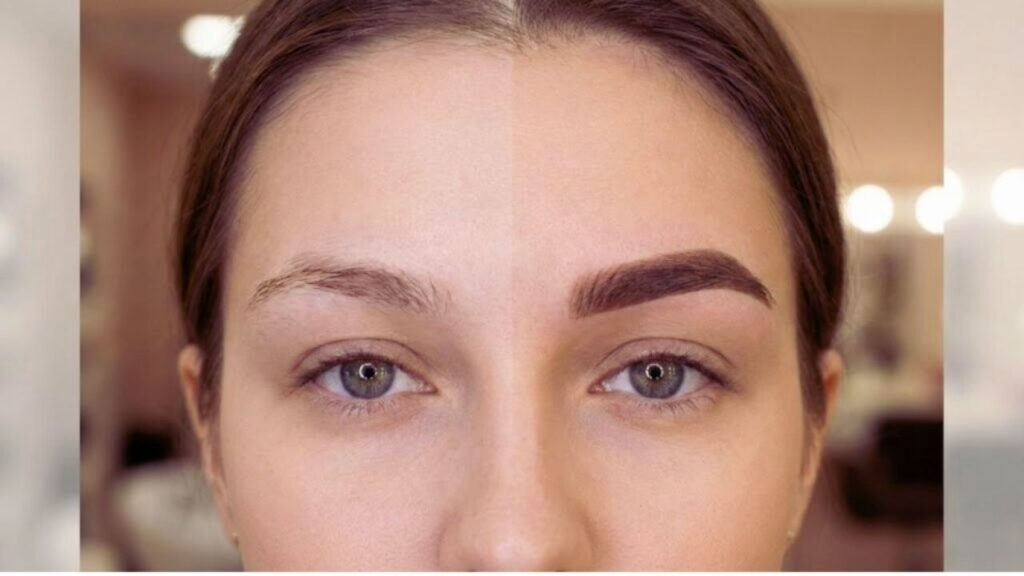
Achieve Beautiful Brows at Home: A Complete Guide
Waking up to full and perfectly shaped eyebrows without the need for a pencil is the ultimate beauty shortcut. By tinting your eyebrows at home, the color can last anywhere between 3 to 6 weeks. The key is to proceed with caution and control to ensure your brows look natural, enhancing your facial features without appearing too dark or messy. This guide will walk you through the steps of safely and neatly tinting your eyebrows at home, so you can achieve salon-style results in the comfort of your own bathroom.
Why At-Home Brow Tinting Is a Game-Changer
Tinting your brows at home offers more than just convenience and the avoidance of salon trips. With a single tint kit, you typically get enough product for multiple uses, whereas a professional session only covers one appointment. By doing it yourself, you have full control over the color depth, the softness of the brow’s front, and the final shape. The tint usually lasts between 3 to 6 weeks on the hair, with the skin stain fading within 5 to 7 days, creating a natural, gradual fade instead of a sudden shift. This flexibility allows you to adjust the shade and timing to match your hair color or seasonal makeup changes, giving your face a more polished, refined appearance, even without makeup.
Understanding How Long Brow Tint Lasts
The longevity of your brow tint depends on various factors such as your skin type, daily activities, and product use. Since hair holds pigment much longer than skin, expect a gradual fade rather than an abrupt disappearance. For dry or normal skin, with gentle cleansing, the color typically stays defined for 3 to 6 weeks, while oily skin, frequent swimming, or sun exposure can cause noticeable fading after 2 to 3 weeks. Heavy oils or exfoliating products near the brows can also accelerate fading. To extend the tint’s lifespan, treat freshly tinted brows gently by avoiding heat, excessive rubbing, and harsh cleansers.

Essential Tools for Safe Brow Tinting
While professional equipment isn’t required, using the right tools ensures even color application and safer results. You’ll need a brow-specific tint or gel (free from ammonia), a developer or oxidant recommended by the brand, a glass or plastic mixing cup, a spatula, an angled brow brush, cotton pads and swabs, a thick cream or petroleum jelly for skin protection, gloves, and a clean spoolie. Micellar water or a gentle toner will help you clean the area. It’s crucial to never use regular hair dye for your brows, as certain ingredients can cause eye injuries or allergic reactions on delicate facial skin.
 Goodbye kitchen cabinets: the cheaper new trend that won’t warp, swell, or go mouldy over time
The Importance of Patch Testing
Before applying the tint, always conduct a patch test by applying a small amount of the product to the skin behind your ear or the inside of your elbow. Leave it for 48 to 72 hours and observe for any signs of irritation such as redness, itching, swelling, or blistering. This simple precaution helps avoid allergic reactions, ensuring that the product is safe to use around your sensitive eye area.
Step-by-Step Guide to Tinting Your Brows
1. Prepare and Shape Your Brows
Start by tweezing any stray hairs that fall above or below your brows and between them. Keep the main shape of your brows intact. Lightly draw the desired shape with a pencil and clean the area using micellar water. This ensures there is no oil residue, allowing the tint to adhere smoothly and evenly to your brows.
2. Protect the Surrounding Skin
Apply a thin layer of petroleum jelly or thick cream along the penciled outline of your brows. Avoid getting it on the brow hairs. This protective layer prevents unwanted staining on your skin and helps create sharper, cleaner edges for a more precise tinting result.
3. Mix the Tint and Developer
Follow the instructions on the product to mix about 0.5 to 0.75 inches of tint with the developer. Stir the mixture until it is smooth and creamy. Choose a color one or two shades darker than your natural brow color, but avoid picking a shade that contrasts too starkly with your hair color.

4. Apply the Tint to Your Brows
Start at the inner part of your brow closest to the nose. Use small, gentle strokes in the direction of your hair growth, making sure to fully cover each hair. As you move towards the outer edge of your brow, reduce the amount of product to avoid a heavy, blocky appearance. Ensure even coverage, especially if your brows contain light or gray hairs.
5. Time the Process Carefully
Set a timer for the recommended processing time, usually between 7 to 15 minutes. Around the 3 to 5-minute mark, use a clean spoolie to gently comb through the inner part of your brow. This softens the front section, preventing it from looking too harsh or overly defined.
6. Remove the Tint and Condition
After the allotted time, gently remove the tint using a cotton pad or swab. Be sure not to rub aggressively, as this could cause irritation or damage to the hair follicles. Follow up with a brow conditioner to keep the area nourished.
7. Assess the Results and Aftercare
After tinting, allow your brows to settle for at least one hour before inspecting them under natural light. Small differences between your brows are common and can be fixed with makeup if necessary. Avoid wetting your brows during the first 24 hours, and refrain from using oil-based products or exfoliating the area for several days.

Common Brow Tinting Mistakes to Avoid
- Skipping the patch test can lead to irritation or allergic reactions.
- Choosing an overly dark or warm shade may result in a harsh, unnatural look.
- Scrubbing while removing tint can irritate the skin and damage hair follicles.
- Neglecting aftercare may cause the tint to fade prematurely due to exposure to heat, sunlight, or strong cleansers.
Why Brow Tinting Is Worth the Effort
Brow tinting at home is a simple yet effective way to enhance your appearance. It gives you a more polished, refreshed look even without makeup. When done correctly, it can save you time, money, and effort, while providing long-lasting, natural results. Once you master the technique, it becomes a vital part of your beauty routine that you’ll likely never want to skip.